WireGuard Easy Installation Guide (old version)
![]()
WireGuard Easy is a simple and secure VPN solution that works across multiple Linux distributions.
This guide will help you install and configure a WireGuard Easy server onto your Debian, Ubuntu, CentOS, Fedora, or AlmaLinux server.
Prerequisites
- A server with root access
- At least 1GB RAM
- A domain name (optional but recommended)
- Port 51820 UDP open in your firewall
Any of our plans will be a great choice to host your own VPN server.
If you are looking for higher speeds when using the VPN, you should look into our "Ryzen 9 7950X3D" plan lineup, as they offer much higher speeds compared to the "EPYC 9454P" lineup.
T&Cs and Fair Usage policy apply.
Installation Steps
0. Connect to your server
Initiate a SSH connection to your server by using the details that you have received during ordering, or set on your own after server activation.
If you don't know how, please follow our "How to connect to the server (Linux)" tutorial
1. Update System Packages
# Install sudo if you don't have it yet
apt-get -y install sudo

sudo apt update && sudo apt upgrade -ysudo dnf update -y2. Install Docker and Docker Compose
# Install required packages
sudo apt install -y apt-transport-https ca-certificates curl software-properties-common

# Add Docker's official GPG key
curl -fsSL https://download.docker.com/linux/ubuntu/gpg | sudo gpg --dearmor -o /usr/share/keyrings/docker-archive-keyring.gpg

# Add Docker repository
echo "deb [arch=$(dpkg --print-architecture) signed-by=/usr/share/keyrings/docker-archive-keyring.gpg] https://download.docker.com/linux/ubuntu $(lsb_release -cs) stable" | sudo tee /etc/apt/sources.list.d/docker.list > /dev/null

# Install Docker
sudo apt update
sudo apt install -y docker-ce docker-ce-cli containerd.io

# Install Docker Compose
sudo curl -L "https://github.com/docker/compose/releases/latest/download/docker-compose-$(uname -s)-$(uname -m)" -o /usr/local/bin/docker-compose
sudo chmod +x /usr/local/bin/docker-compose# Install required packages
sudo dnf install -y dnf-plugins-core
# Add Docker repository
sudo dnf config-manager --add-repo https://download.docker.com/linux/fedora/docker-ce.repo
# Install Docker
sudo dnf install -y docker-ce docker-ce-cli containerd.io
# Install Docker Compose
sudo curl -L "https://github.com/docker/compose/releases/latest/download/docker-compose-$(uname -s)-$(uname -m)" -o /usr/local/bin/docker-compose
sudo chmod +x /usr/local/bin/docker-compose3. Start and Enable Docker
# Start the Docker service
sudo systemctl start docker
# Add Docker to startup applications
sudo systemctl enable docker
4. Create WireGuard Easy Configuration
Create a new directory for WireGuard Easy:
mkdir -p ~/wireguard-easy
cd ~/wireguard-easy
Create a docker-compose.yml file:
cat > docker-compose.yml << EOF
version: '3.8'
services:
  wireguard:
    image: ghcr.io/wg-easy/wg-easy
    container_name: wg-easy
    environment:
      - WG_HOST=your-server-ip-or-domain
      - PASSWORD=your-password
      - WG_PORT=51820
      - WG_DEFAULT_DNS=1.1.1.1,8.8.8.8
    volumes:
      - ./wg-easy:/etc/wireguard
    ports:
      - "51820:51820/udp"
      - "51821:51821/tcp"
    restart: unless-stopped
    cap_add:
      - NET_ADMIN
      - SYS_MODULE
    sysctls:
      - net.ipv4.ip_forward=1
      - net.ipv4.conf.all.src_valid_mark=1
EOF
Replace your-server-ip-or-domain with your server's IP address or domain name, and your-password with a secure password for the web interface.
5. Start WireGuard Easy
docker-compose up -d6. Access the Web Interface
Open your web browser and navigate to:
http://your-server-ip:51821Where your-server-ip - your server's IPv4 address.
Configuration
- Log in to the web interface using the password you set
- Create new clients by clicking the "Add Client" button
- Download the client configuration file (
.conffile) - Import the configuration into your WireGuard client
Client Installation
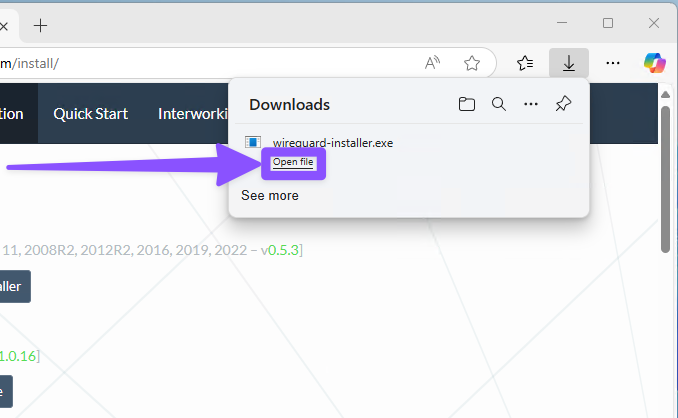
Windows
- Download WireGuard from the official website - wireguard.com

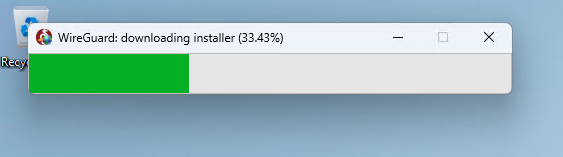
- Open the installer and wait for installation to complete
The application will open up automatically after the installation is all done.
- Import the configuration file
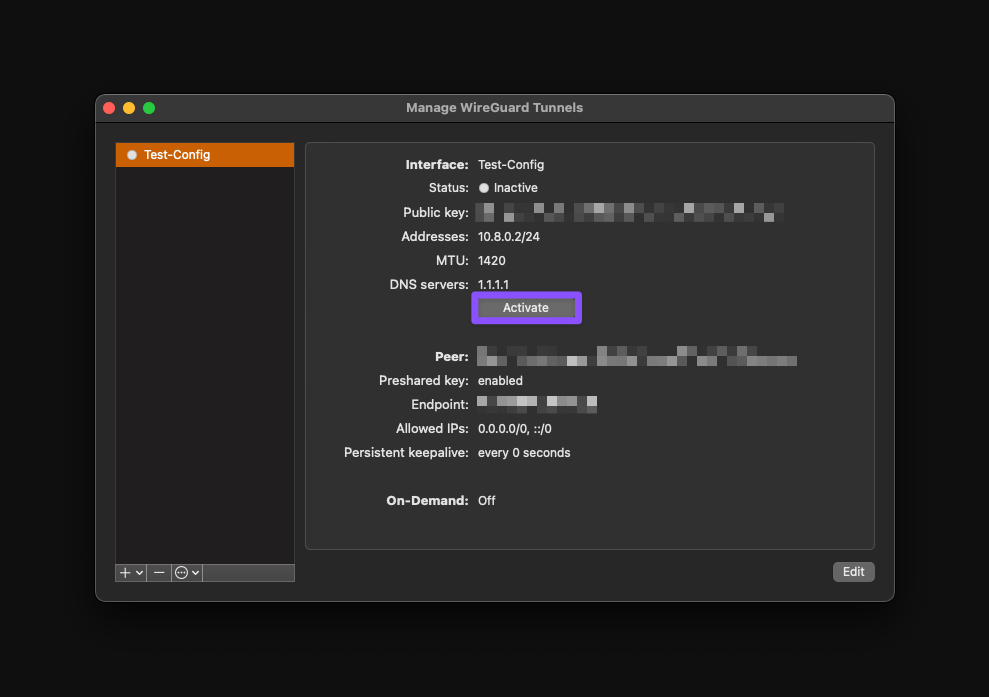
- Connect to the VPN
You can do so by clicking the "Activate" button.
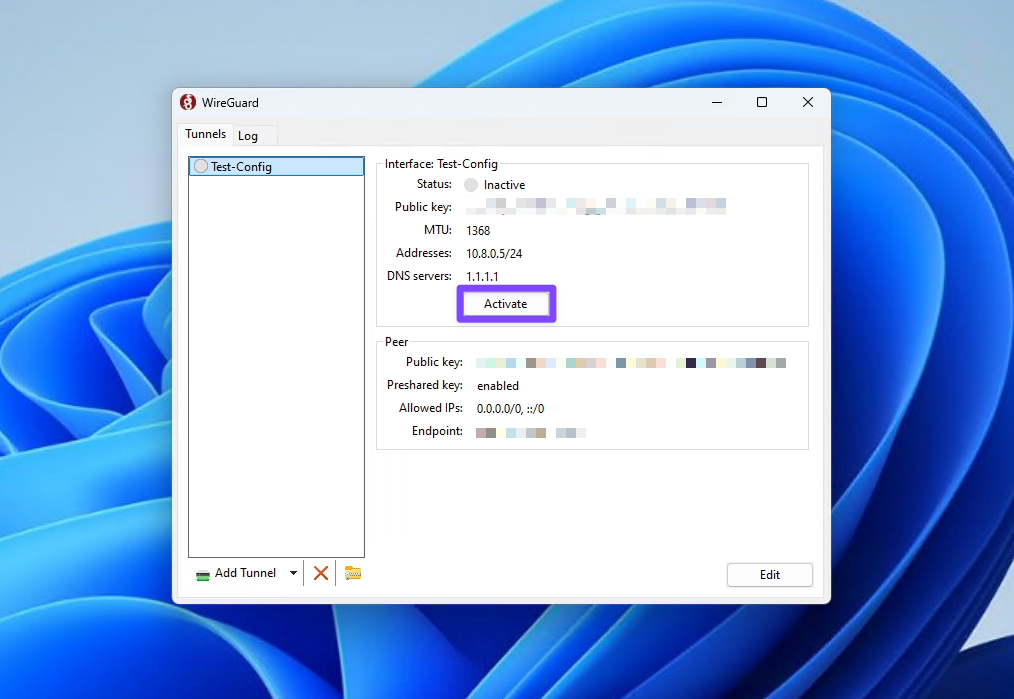
You're all set up!
All your internet traffic should be now routed through the VPN.
macOS
- Install WireGuard from the Mac App Store
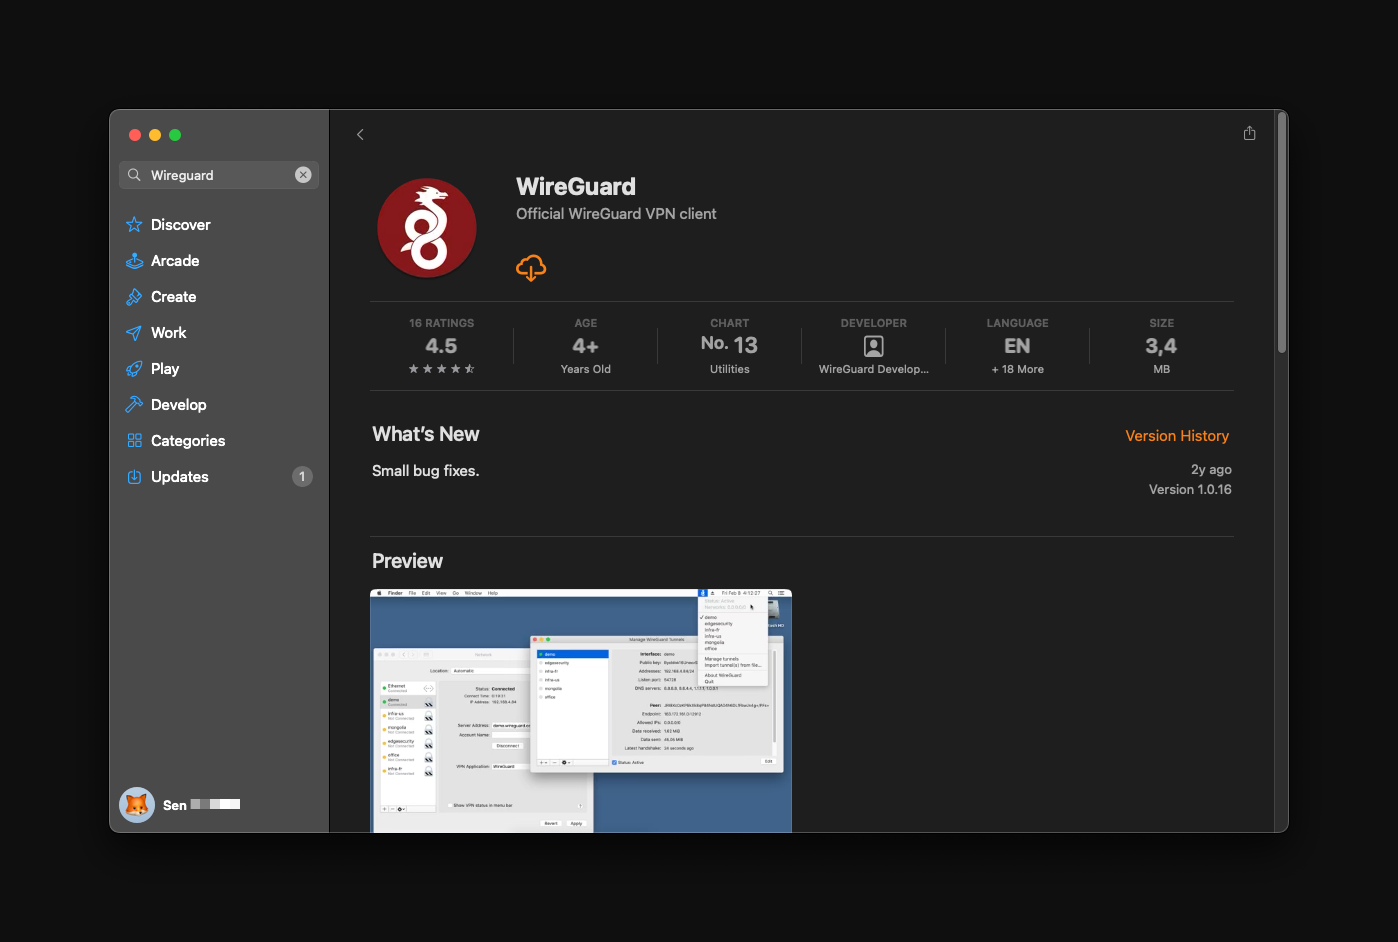
- Launch the application
- Import the configuration file
If this is your first time using WireGuard on your computer, macOS will ask whether you should allow WireGuard to create and manage VPN connections.
Click "Allow" to let the app do its job.
- Connect to the VPN
You can do so by clicking the "Activate" button.
All done! Your internet traffic should be routed through the VPN now.
Linux
sudo apt install wireguardsudo dnf install wireguard-toolsAfter installation, you can connect to the VPN using either the command line or a graphical interface.
Command Line Method
Import the Configuration
bash# Copy the configuration file to the WireGuard directory sudo cp your-config.conf /etc/wireguard/wg0.confStart the VPN Connection
bash# Start the VPN sudo wg-quick up wg0 # Check the connection status sudo wg showStop the VPN Connection
bashsudo wg-quick down wg0Enable Auto-Start (Optional)
bashsudo systemctl enable wg-quick@wg0 sudo systemctl start wg-quick@wg0
Graphical Interface Method
Install NetworkManager WireGuard Plugin
bashsudo apt install network-manager-wireguardbashsudo dnf install NetworkManager-wireguardImport Configuration
- Open Network Manager (usually found in system settings)
- Click the "+" button to add a new connection
- Choose "Import a saved VPN configuration"
- Select your
.conffile - Click "Add"
Connect
- Click on the network icon in your system tray
- Select your WireGuard connection
- Enter your password if prompted
- Click "Connect"
Troubleshooting Linux Connection
Check Interface Status
baship addr show wg0This command shows detailed information about your WireGuard interface. Look for:
inetaddress: Should show your assigned VPN IP addressUPstatus: Indicates the interface is activePOINTOPOINTflag: Should be present for VPN connections
Example of a working interface:
4: wg0: <POINTOPOINT,UP,LOWER_UP> mtu 1420 qdisc noqueue state UNKNOWN group default qlen 1000
    link/none
    inet 10.0.0.2/24 scope global wg0
       valid_lft forever preferred_lft forever
Check Routing Table
baship routeThis shows all network routes. For a working VPN connection, you should see:
- A route for your VPN subnet (e.g.,
10.0.0.0/24 dev wg0) - A default route through the VPN if you're using full tunnel mode
- Specific routes for split tunneling if configured
Example output with VPN active:
default via 10.0.0.1 dev wg0 10.0.0.0/24 dev wg0 proto kernel scope link src 10.0.0.2- A route for your VPN subnet (e.g.,
Check DNS Resolution
bashcat /etc/resolv.confVerify that your DNS servers are correctly configured. You should see:
- The DNS servers specified in your WireGuard config
- No conflicting DNS configurations
Example of correct DNS configuration:
nameserver 1.1.1.1
nameserver 8.8.8.8
Check Firewall Rules
bashsudo iptables -LThis shows your firewall rules. Look for:
- Rules allowing UDP traffic on port 51820
- Rules allowing traffic through the wg0 interface
- No rules blocking VPN traffic
Example of correct firewall rules:
Chain INPUT (policy ACCEPT)
target     prot opt source               destination
ACCEPT     udp  --  anywhere             anywhere             udp dpt:51820

Chain FORWARD (policy ACCEPT)
target     prot opt source               destination
ACCEPT     all  --  anywhere             anywhere
View Connection Logs
bashjournalctl -u wg-quick@wg0This shows system logs for the WireGuard service. Look for:
- Successful interface creation
- No permission errors
- No routing conflicts
- Successful handshake messages
Example of successful connection logs:
Starting WireGuard via wg-quick(8) for wg0...
[#] ip link add wg0 type wireguard
[#] wg setconf wg0 /dev/fd/63
[#] ip -4 address add 10.0.0.2/24 dev wg0
[#] ip link set mtu 1420 up dev wg0
[#] wg set wg0 fwmark 51820
[#] ip -4 route add 0.0.0.0/0 dev wg0 table 51820
Check WireGuard Status
bashsudo wg showThis shows detailed WireGuard interface status. Look for:
latest handshake: Should be recent (within last 2 minutes)transfer: Should show increasing numbers for active connectionsallowed ips: Should match your configuration
Example of a working connection:
interface: wg0
  public key: your-public-key
  private key: (hidden)
  listening port: 51820

peer: server-public-key
  endpoint: your-server:51820
  allowed ips: 0.0.0.0/0
  latest handshake: 1 minute, 23 seconds ago
  transfer: 1.21 MiB received, 3.45 MiB sent
Test Connection
bashping -I wg0 1.1.1.1This tests connectivity through the VPN interface. You should see:
- Successful ping responses
- Low latency (typically < 100ms)
- No packet loss
Example of successful ping:
PING 1.1.1.1 (1.1.1.1) from 10.0.0.2 wg0: 56(84) bytes of data.
64 bytes from 1.1.1.1: icmp_seq=1 ttl=57 time=45.3 ms
64 bytes from 1.1.1.1: icmp_seq=2 ttl=57 time=46.1 ms
Android/iOS
- Install WireGuard from the respective app store - Google Play / App Store
- Import the configuration file - you can do so by scanning the QR code in the web interface of WireGuard Easy
- Connect to the VPN
Troubleshooting
Common Issues
Can't connect to the web interface
- Check if port 51821 is open in your firewall
- Verify Docker is running:
sudo systemctl status docker
VPN connection issues
- Ensure port 51820 UDP is open in your firewall
- Check if the server's IP address is correct in the configuration
- Verify the client configuration is properly imported
Slow connection
- Check your server's network connection
- Verify there are no bandwidth limitations
- Consider using a different DNS server
You can also follow our guide with instructions on what to do with low speed through VPN.
Security Recommendations
- Always use strong passwords for the web interface
- Keep your system and Docker updated
- Use a firewall to restrict access to necessary ports only
- Consider using a domain name with SSL for the web interface
- Regularly backup your WireGuard configurations
Maintenance
Updating WireGuard Easy
cd ~/wireguard-easy
docker-compose pull
docker-compose up -d
Backup Configuration
cp -r ~/wireguard-easy/wg-easy ~/wireguard-backupRestore Configuration
cp -r ~/wireguard-backup ~/wireguard-easy/wg-easy
docker-compose restart