'%3e%3cpath%20d='M28.66%2032C20.1933%2032%2011.7267%2032%203.26%2032C3.18583%2031.9633%203.10667%2031.9742%203.0275%2031.9683C2.65167%2031.9383%202.31%2031.7958%201.98083%2031.6242C1.48917%2031.3683%201.0775%2031.015%200.7375%2030.5792C0.41%2030.1592%200.176667%2029.6917%200.0566667%2029.1708C0.0241667%2029.0308%200.0308333%2028.8867%200.0225%2028.7442C0.0208333%2028.7158%200.03%2028.6825%200%2028.6608C0%2020.22%200%2011.78%200%203.34C0.0358333%203.28417%200.0208333%203.22%200.0225%203.16083C0.0316667%202.77417%200.153333%202.4175%200.325%202.08C0.768333%201.20667%201.4375%200.573333%202.35417%200.205C2.63417%200.0925%202.92167%200.0308333%203.22083%200.0158333C3.26083%200.0133333%203.30583%200.05%203.34%200C11.8267%200%2020.3133%200%2028.8%200C28.8592%200.0641667%2028.94%200.03%2029.0075%200.035C29.1675%200.0475%2029.3192%200.0883333%2029.4683%200.139167C30.0775%200.344167%2030.6%200.685833%2031.0367%201.15583C31.4858%201.63917%2031.7967%202.1975%2031.945%202.84333C31.9767%202.98167%2031.9692%203.12417%2031.9775%203.265C31.9792%203.29167%2031.9717%203.32083%2031.9992%203.34C31.9992%2011.78%2031.9992%2020.22%2031.9992%2028.66C31.9508%2028.7267%2031.97%2028.8067%2031.9708%2028.8758C31.9733%2029.1008%2031.9183%2029.3125%2031.8433%2029.5183C31.4908%2030.4808%2030.8533%2031.195%2029.9433%2031.6625C29.6825%2031.7967%2029.4083%2031.905%2029.1133%2031.9483C28.9867%2031.9667%2028.86%2031.97%2028.7333%2031.9758C28.7067%2031.9775%2028.6792%2031.9733%2028.66%2032Z'%20fill='%230081FF'/%3e%3cpath%20d='M19.6307%2018.4926C19.394%2018.7759%2019.1574%2019.1184%2018.8624%2019.3992C18.2624%2019.9692%2017.5124%2020.2667%2016.7149%2020.4401C15.754%2020.6492%2014.7874%2020.6217%2013.8182%2020.4909C12.6082%2020.3284%2011.5457%2019.8384%2010.6199%2019.0559C9.84069%2018.3967%209.28153%2017.5726%208.88319%2016.6359C8.47653%2015.6809%208.26653%2014.6768%208.15986%2013.6518C8.00569%2012.1701%208.07736%2010.7001%208.52069%209.26842C8.88486%208.09258%209.43819%207.01842%2010.2774%206.09925C11.2499%205.03342%2012.4315%204.34008%2013.8415%204.04925C14.6299%203.88675%2015.4257%203.88675%2016.2224%204.01592C17.639%204.24675%2018.7332%204.97342%2019.5349%206.15592C19.5557%206.18258%2019.634%206.29925%2019.634%206.29925C19.634%206.29925%2019.634%205.90092%2019.634%205.73008C19.6332%205.30008%2019.634%204.35425%2019.634%204.35425C19.634%204.35425%2019.7249%204.35425%2019.7465%204.35425C21.0199%204.35008%2023.9107%204.35342%2023.9107%204.35342C23.9107%204.35342%2023.9099%204.51675%2023.9099%204.71008C23.9099%2010.0768%2023.9174%2015.4434%2023.9057%2020.8093C23.9024%2022.5059%2023.4232%2024.0592%2022.3357%2025.3884C21.4899%2026.4217%2020.3982%2027.1026%2019.1482%2027.5426C17.9315%2027.9709%2016.6732%2028.1184%2015.3915%2028.0642C13.9907%2028.0051%2012.6424%2027.7017%2011.4124%2027.0109C9.56069%2025.9701%208.43569%2024.4092%208.15653%2022.2793C8.11903%2021.9968%208.10986%2021.7092%208.09903%2021.4242C8.09819%2021.4067%208.09319%2021.3151%208.09319%2021.3151C8.09319%2021.3151%208.17986%2021.3151%208.19819%2021.3151C9.46819%2021.3092%2010.7382%2021.3084%2012.0082%2021.3126C12.0232%2021.3126%2012.0832%2021.3134%2012.0832%2021.3134C12.0832%2021.3134%2012.0824%2021.3934%2012.0824%2021.4067C12.0957%2022.1451%2012.3007%2022.8118%2012.8132%2023.3601C13.1957%2023.7693%2013.6682%2024.0401%2014.2049%2024.1842C15.4515%2024.5201%2016.6707%2024.4501%2017.829%2023.8526C18.8707%2023.3151%2019.529%2022.4742%2019.604%2021.2817C19.6599%2020.3826%2019.6265%2019.4767%2019.6324%2018.5742C19.6307%2018.5292%2019.6307%2018.4826%2019.6307%2018.4926Z'%20fill='white'/%3e%3cpath%20d='M12.5641%2012.485C12.5391%2011.5025%2012.6416%2010.5375%2013.0266%209.62252C13.4791%208.54836%2014.2691%207.89419%2015.4349%207.71586C16.2407%207.59252%2017.0249%207.64502%2017.7674%208.00502C18.5091%208.36502%2018.9666%208.98002%2019.2666%209.72502C19.5607%2010.4542%2019.7107%2011.22%2019.7216%2012.0009C19.7316%2012.6992%2019.7291%2013.4084%2019.6216%2014.0959C19.4057%2015.4767%2018.4474%2016.7692%2016.9774%2017.1292C15.6366%2017.4575%2014.2532%2016.9434%2013.4541%2015.8117C12.8924%2015.0175%2012.6332%2014.1275%2012.5657%2013.1717C12.5507%2012.9442%2012.5641%2012.7142%2012.5641%2012.485Z'%20fill='%230081FF'/%3e%3c/g%3e%3cdefs%3e%3cclipPath%20id='clip0_11_2'%3e%3crect%20width='32'%20height='32'%20fill='white'/%3e%3c/clipPath%3e%3c/defs%3e%3c/svg%3e) Installing and Configuring ULX
Installing and Configuring ULX
Quick guide to installing and configuring the ULX admin system on your Garry's Mod server.
Introduction
ULX is a powerful administrative system for Garry's Mod servers that provides a wide range of server management capabilities.
In this guide, we'll cover the process of downloading and installing ULX and ULib, granting superadmin rights, and using the ULX interface.
Downloading the Addons
First, you need to download ULX and ULib to your PC.
Installing on the Server
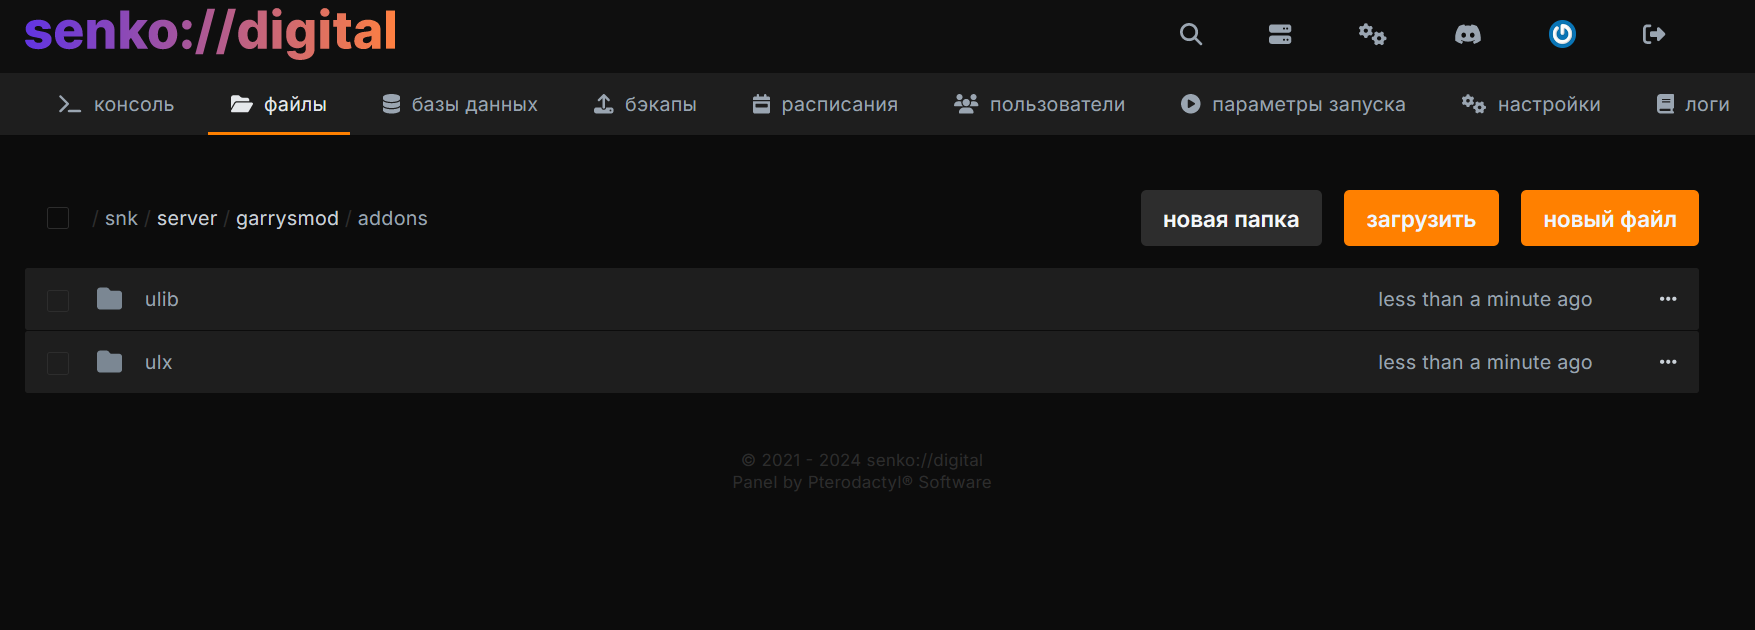
- Upload both archives to the
/garrysmod/addons/path using the file manager in the control panel. - Right-click on the ULib archive, select the "extract" option. Delete the archive after extraction is complete. For convenience, you can rename the new folder to
ulib, removing the-mastersuffix. - Extract the ULX archive, delete the archive after extraction, and also rename the folder to
ulx, removing the-mastersuffix.

After this, ULX and ULib will be installed on your server.
TIP
The links are safe and point to the official GitHub repository from the original addon developer - Team Ulysses.
Initial ULX Setup
After installing ULX and ULib, you need to perform the initial setup of administrator privileges.
Granting Superadmin Rights
By default, the list of superadmins and admins is empty. Let's fix that!
Granting Rights via Nickname
Go to your game server console and grant yourself superadmin rights using the command:
ulx adduser nickname superadminwhere nickname is your Steam nickname.
Granting Rights via SteamID
If your nickname is difficult to type, or you don't want to join the server to grant rights, you can also grant yourself superadmin rights using your SteamID.
You can get it using the website steamid.xyz
Example command execution:
ulx adduserid STEAM_0:1:7099 superadminOpening the Menu
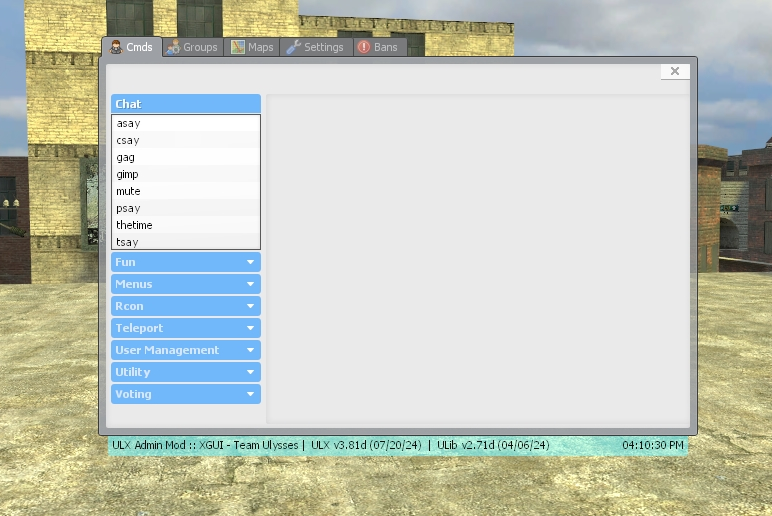
In the game itself, you can use the ULX management menu - this is where administrator and regular user rights are configured, as well as various commands are executed.
You can open the menu using the console command (in the game):
ulx menuAssigning a Key to Open the Menu
For more convenient menu access, you can also assign it to any key that works for you.
This is done using the following command:
bind [key] "ulx menu"For example:
bind m "ulx menu"Done! Now the menu will open without using extra console commands.

Now you can proceed with further ULX configuration without unnecessary hassle.